
Ensuring Reliability and Minimizing Field Failures
1. Why Pre-Shipment QC Is Critical
Inverters are the heart of any solar + storage system. Whether it’s a grid-tied rooftop or an off-grid containerized setup, a failed inverter can halt operations, damage other equipment, and erode customer trust.
For middlemen, system integrators, and OEM distributors, conducting essential quality control (QC) steps before shipment is a practical and necessary strategy to avoid returns, complaints, and reputational loss.
This article outlines the critical QC steps to perform before sending an inverter to a client, especially when dealing with overseas sourcing or custom-configured models.
2. When and Where Should QC Happen?
📍 Ideal Time: After production but before packaging
🏭 Ideal Location: At the factory (in-house) or via third-party inspection service
💼 Who’s Responsible:
- OEM: Expected to run baseline QC
- Middleman/Buyer: Should conduct final QC before shipment
- Third-Party Agent: Recommended for international deals
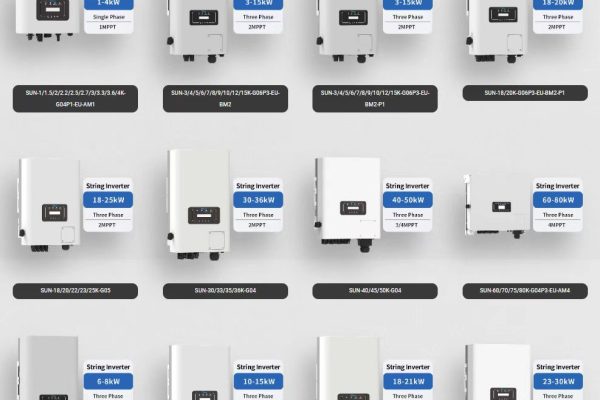
3. Pre-Shipment QC Checklist for Inverters
Below is a practical step-by-step checklist for both string and hybrid inverters.
✅ 1. Visual Inspection
- Check for dents, scratches, or discoloration
- Confirm correct branding and labeling
- Verify LCD/LED screen is scratch-free and functional
- Ensure all ports and terminals are undamaged
✅ 2. Nameplate and Serial Number Verification
- Match model, voltage, and power specs with purchase order
- Confirm correct certifications (CE, UL, TUV, etc.)
- Verify unique serial number for traceability
✅ 3. Internal Wiring and Build Quality
May require partial disassembly or manufacturer cooperation
- Look for clean solder joints, no loose wires
- Confirm gauge and layout of wiring matches spec
- Check for moisture ingress, rust, or improper grounding
✅ 4. Basic Electrical Function Test
- Power up unit (with test loads or dummy loads)
- Verify startup time is within tolerance
- Confirm normal status indicators (no fault codes)
- Simulate grid connection (for grid-tied models)
- Test inverter’s ability to charge/discharge (for hybrid models)
✅ 5. AC and DC Voltage Range Test
- Measure:
- DC input voltage range
- AC output voltage range
- Confirm inverter operates within tolerance (±2% typical)
✅ 6. Thermal Behavior Check
- Run unit for 10–20 minutes under 40–60% rated load
- Use IR thermometer to spot-check heat sinks and internal components
- Ensure no hotspots (>70°C unless rated for it)
✅ 7. Protection Function Testing
- Simulate:
- Over-voltage
- Under-voltage
- Overload
- Short circuit
- Confirm inverter responds correctly:
- Shuts down or throttles power
- Resets cleanly after fault cleared
✅ 8. Wi-Fi / Communication Check
- Connect to inverter via app or monitoring portal
- Confirm correct device ID and firmware version
- Test signal strength (for wireless models)
- Confirm RS485 or CAN port functionality (if applicable)
✅ 9. Packaging and Accessories Check
- Confirm inclusion of:
- User manual
- Mounting brackets and hardware
- Communication cables
- Warranty card
- Ensure proper foam or corner protection inside box
- Label packaging with fragile/polarity stickers if needed
✅ 10. Documentation & QC Reports
- Record serial number, test values, fault codes (if any)
- Take photos of serial plate and display screen
- Sign off QC checklist with date and inspector name
- Optionally, share basic test video with client for transparency
4. Optional Advanced Tests
For large batches or critical applications, consider:
| Test | Benefit |
|---|---|
| Full Load Burn-in (2–4 hrs) | Reveals heat/fan/driver weaknesses |
| Grid Simulation Test | Tests response to voltage/frequency deviations |
| Harmonic Distortion Check (THD) | Important for sensitive loads |
| EMC Emission Scan | Ensures inverter won’t interfere with nearby devices |
5. Common Inverter QC Failures (And What They Indicate)
| Failure | Possible Cause |
|---|---|
| Fails to power on | Internal wiring, loose PCB, damaged MCU |
| Overheat in 15 min | Poor thermal paste, blocked vents |
| High idle consumption | Faulty driver circuit or firmware bug |
| CAN/RS485 no response | Bad solder joint or firmware version mismatch |
| Display flickering | Power supply instability or screen defect |
6. QC for Repackaged or OEM-Branded Inverters
If you’re selling an OEM inverter under your own brand:
- Always conduct full re-QC under your label
- Ensure firmware matches your brand’s app
- Confirm warranty and SN registration system is in place
- Inspect packaging for consistency with your brand image
7. Should You Hire a Third-Party Inspector?
Use third-party QC when:
- Working with a new manufacturer
- Shipping high-value or bulk orders
- You can’t visit factory yourself
Top agencies include: SGS, TUV, Intertek, and regional inspectors in China or Southeast Asia.
Typical inspection costs range from $200–$500 per day, and they can provide detailed photo reports and QC certificates.
8. QC Is a Sales Tool, Not Just a Technical Step
QC is often viewed as an internal cost—but in the inverter business, it’s a powerful sales differentiator.
By enforcing strong pre-shipment testing:
- You reduce RMA rates
- Win trust from installers and EPCs
- Show reliability even in high-competition markets
Whether you’re a small distributor or building your brand, documented, repeatable QC processes are essential to long-term success.